Visit The Bowl Store or ETSY for more information and pricing.
How I Make Them
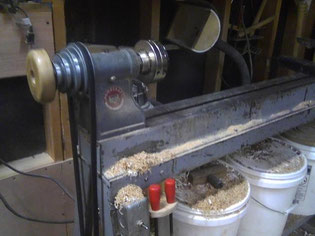
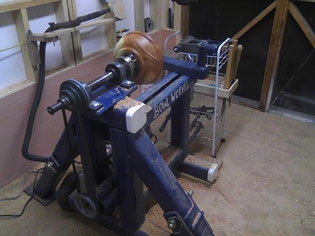


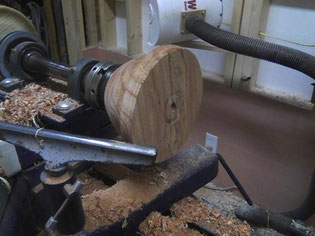


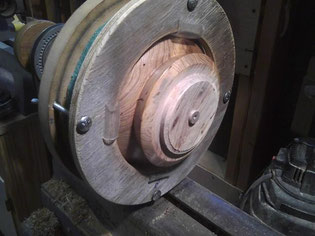

My smaller bowls (10 inch or less) are turned on a pre WWII Delta Homecraft lathe. After 70 + years it still performs with incredible accuracy. My larger bowls are turned on the "Bowl Weevil", a homemade lathe that I designed and built. It has the capacity to accommodate a bowl with a 19 inch diameter. The bowls I create are turned from green Oak, Pecan, Hickory, Cedar, Holly, Chinaberry, Walnut, Red Maple, Black Gum and other species of wood. The tree section is sawn to length depending on the diameter of the log. This piece is then sawn in half lengthwise. This produces two parts, usually of different sizes, depending on where the pith (center) of the tree lies. Each part is then roughed into a circular form with a chainsaw or a band saw. This piece is mounted on the lathe in different ways, depending on individual circumstances unique to that piece of wood. Density, soft spots, grain, intrusions, bark, as well as notions of what it can become, come into play when initially placing the wood on the lathe. Typically, I start with the flat surface to my left against the headstock. This allows a right handed person to more readily round the blank. As the wood takes a cylindrical shape I can began to shape the outside of the bowl, and turn a foot on the bottom, which I can then reverse and place in a chuck. Once reversed, I can hollow the inside of the bowl. Green wood will warp as the moisture evaporates. The way I choose to deal with this, among many, is to rough turn the bowl and leave approximately 10 % thickness on the walls and the bottom. For example, I leave 1 inch for 10 inches of diameter . This potential bowl then sleeps overnight (24 hours) in denatured alcohol . After removal it drip dries for half an hour or so, then is wrapped in newspaper. A hole is cut in the paper on the bowl opening side and is set aside for a few weeks to dry and warp as it sees fit. Moisture in green wood is usually above 30%. I will typically unwrap the bowl when moisture is less than 10% and in a couple of days it will be down to 6% or less. I now return the foot from the oval shape before remounting the bowl in progress back onto the lathe. This is when the more tedious part of re-rounding and shaping take place. At this point the final shape begins to emerge from the oval and wobbly form. Extremely accurate and skillful placement of the precision ground tool to the rotating edge of the---this is bull. From a lot of practice, I can get a smooth cut on the bowl, which, depending on the texture of the wood, can reduce sanding to a minimum. Once all tool marks are eliminated and the bowl surface is smoothed to my satisfaction, I apply a finish that I feel will compliment the style and texture of the almost completed bowl. I mostly use a homemade donut chuck that reverses and captures the bowl with the foot totally exposed in order to finish the bottom surface. The bowl is taken off the lathe, out of the chuck, and admired. Walla! "My favorite."
